Tweaking, Fluffing, and Trying to Make Things Fabulous

Sunday, September 25, 2011

Ta-Da! Kitchen Cabinet Makeover

Ok ok ok... I failed, I admit it. Feel free to shake your head at me, its well deserved.  I haven't posted on my poor little blog in MONTHS!  What started as a need for a break in order to focus on a major event at work turned into months and months of silence.  The thing is, I knew I needed to post something but after two months of no posts I felt like I needed a major item to blog about instead of the inconsequential items that I could come up with--- so the silence continued.  


Well my friends the day has come-- I finally did something BIG--- well big enough to pull this blog-o-mine out of hibernation.  I PAINTED THE KITCHEN CABINETS WHITE!!!  If you have read my blog at all you would know that I have begged and pleaded for this for years, seriously years.  Dan wasn't so sure about taking brand new cabinets and throwing paint all over them (his words not mine) for fear of ruining a perfectly fine cabinet.  I have to admit he made some valid points-- so valid in fact that when he said, "hey I watched a commercial last night about some cabinet makeover kit by Rust-Oleum and it looks kind of neat-- what do you think" I kind of had a moment of panic. What if it did look awful?!?!  I love me some projects but I am by no means a perfectionist and I tend to get bored with a project about 5 minutes after it starts so a so-so outcome was possible.  Of course that was all internal-- I was all sorts of confident with Dan.  


So off I went the very next day and purchased the Rust-Oleum cabinet makeover kit in pure white. I was pretty psyched b/c it was labor day weekend and I was fairly confidant that at the end of the three day weekend my kitchen would be done. Um- yeah right.  It has taken- no joke- three weeks to complete this project and that includes working weekends and weekdays.  The cabinet door fronts took 6-- yes S-I-X coats of paint which equals three of the small Rust-Oleum kits.  Technically I only needed one kit and 5 of the paint cans but in order to purchase the paint you have to purchase the kits.  If anyone is in need of the kit-- minus the paint, let me know:-)


Okay so enough blubbering-- I followed the kit to a "T" and am pretty psyched about the outcome.  If you are one of those people that considers painting over lovely wood a crime-- then feel free to gasp in horror :-)

Original Kitchen-- Right after moving in

This is about six months ago-- after I decided to paint the kitchen island white.

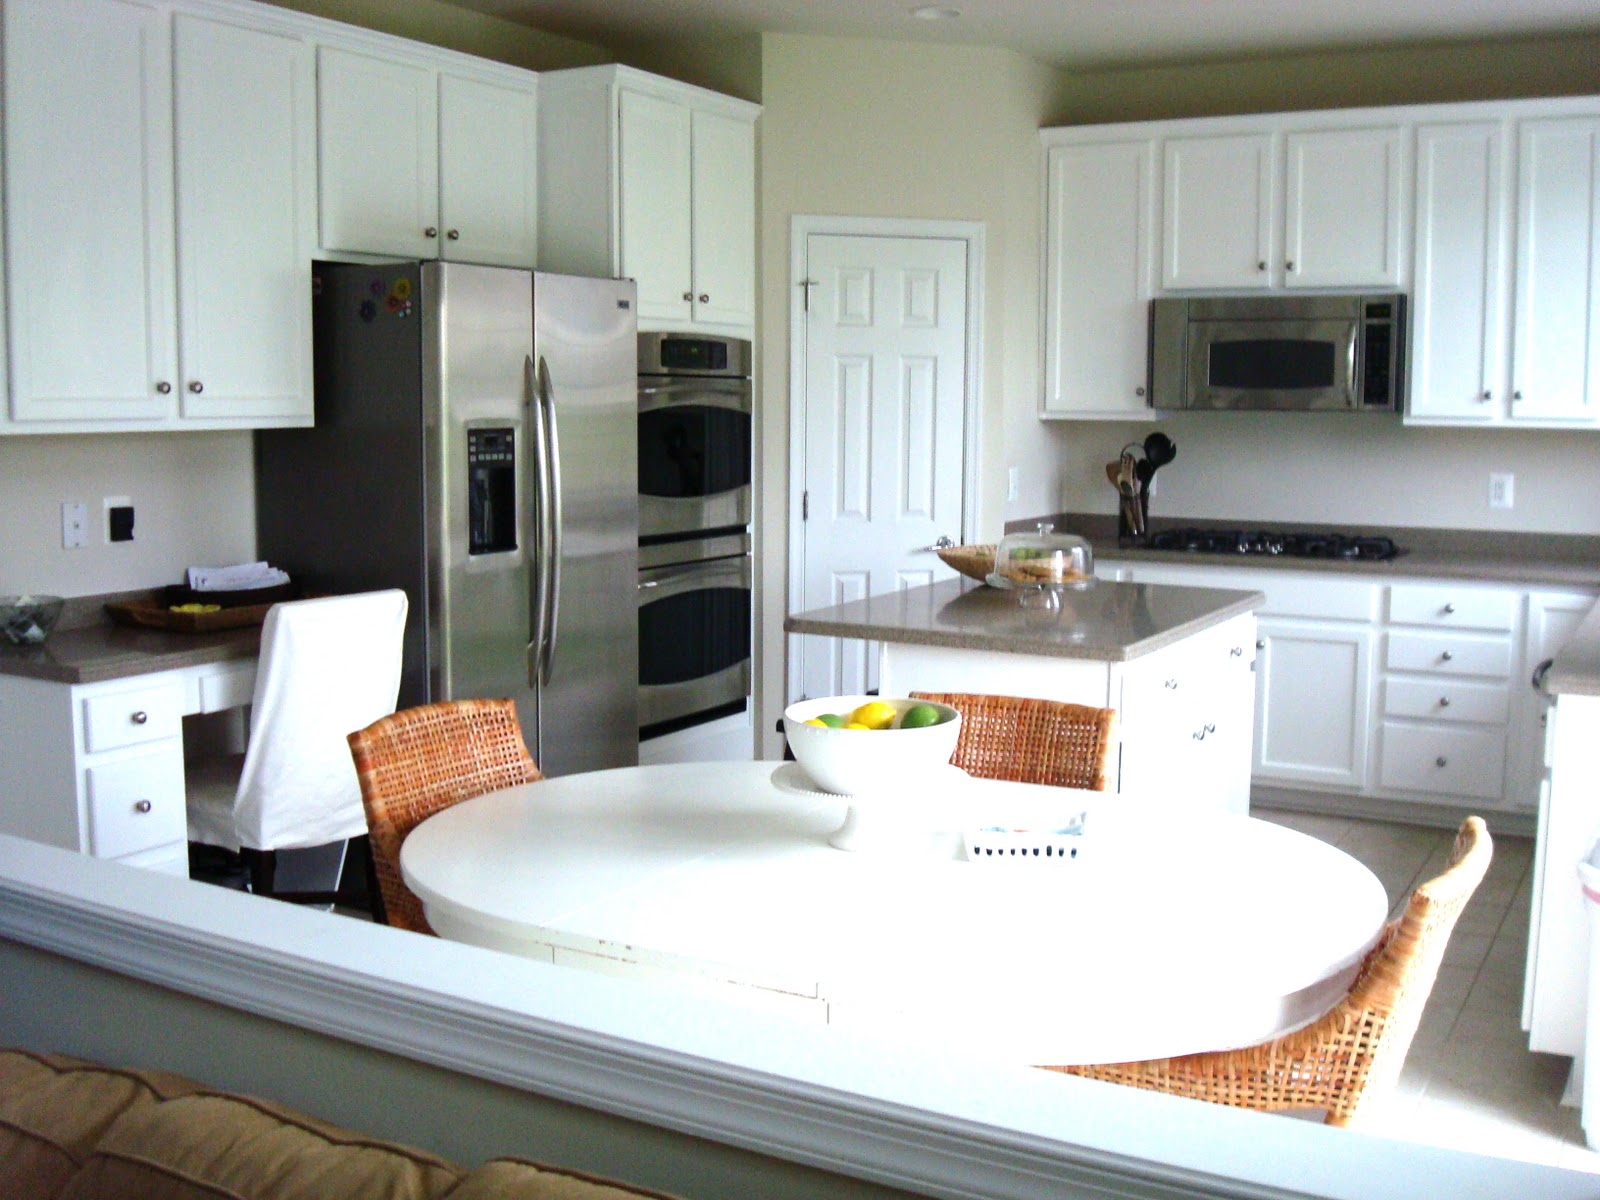
Here is the kitchen now!  Forgive the odd lighting-- I really should learn how to use this camera of mine.  Its a little stark now BUT we are going to paint the walls and put a backsplash in-- just need to figure out which one:-)


So.... Im dying to know what you think?!?!  Love it? Hate it?  Don't really care? OH BTW-- I got a AMAZING dining room hutch the other day for $50.00 Love me a good deal!


Carolyn

Wednesday, May 4, 2011

Hi and Bye!

Just popping in for a second to say "HI" and to let you all know that I am still alive and well :-)  The past few weeks have been crazy insane... this time of the year at work is like tax time for accountants in April. The craziness ends in late June and I plan on being back on my game at that time.  Rest assured that I am still thrifting and decorating in my free time... I'm just not witty enough to write up blog posts in the evening that you may actually enjoy.  Our couch FINALLY arrived-- pics to come soon...promise!

Muah!

Carolyn

Sunday, April 17, 2011

Rain Rain Go Away

I don't know about you all but we got a crazy amount of rain yesterday.  This makes for THREE rainy Saturdays in a row-- ugh! what gives?!?  I decided as long as I was going to spend a majority of the day in my house I might as well get something done...so yesterday I made a ton of pillow for our new Bentley Sectional.  He is a pretty big brown boy so I wanted some pillows that would brighten him up.  Here he is as a reminder

I headed off to IKEA a few weeks ago and bought these fabrics.  The yellow one was on clearance for $2.99/yard-- cant beat that with a stick:-) The green one was full price- $9.99/yard but I think green and white stripes is JUST what our basement needs!  The red one was also on clearance so I picked it up but I'm not sure where it will go or what I will do with it. Oddly enough, I am not really a fan of red, but for $2.99/yard how can you say no?


Then yesterday I got out my sewing machine and went to work!  Here are 3 of the 7 pillows that I made.  I think these bright colors will make our new sectional look like a happy fellow. I love that I can turn the pillows either way for horizontal or vertical stripes. 


I need to find another pattern to tie these together and bring in a little more color but I haven't found "the one" yet.  Let me know if you have any ideas!

Off to play softball tonight-- wish me luck-- I am TERRIBLE!!

Carolyn

Tuesday, April 12, 2011

This Is Unique

This girl is living under a rock.  I spent Saturday with my friend Ash and she opened my eyes to a whole new world of thrifting with a little bit of american culture thrown in on the side- you know, for good measure.  Not only did I not know about this "all the rage" new thrift store but I got quite the befudled look when I didnt know what Livingsocial was.  Do you know?  If not there is a good chance we are cohabitating under the same rock.  AND... did you know that the government recently shutdown- Say what?!?!  Haha-- just joshin' you... I am not THAT out of it.  


Anyways.. Saturday was some funny times.  Me and Ash went to a place called "Unique Thrift Store" and let me tell you that place was insane and well, unique (har har). This place was no joke.  They had literally every item you could want and would never want all in the same warehouse together.  We are talking some thrift store underroos, old lady grey wigs, and bags filled with the most random chochski's.  Nothing was off limits here people.  Here are some pics Ash took with her camera phone...she insisted the blogging world NEEDED these pics:-) Sorry they are so tiny... the first pic is me holding ceramic chicken and rooster heads.  Dont get me wrong--I love me some ceramic animals like the best of them but these bad boys were a little much.


So after a afternoon fighting the craziness that was "Unique" this is what I brought home...


A silver shell... not 100% sure what Im going to put in here but its big and heavy duty and when Ash said she wasn't going to get it I scooped it up!  AND because you cant tell from the picture its size...its about the size of one and a half of my heads... and I have a pretty big dome from what I am told. OH!  The fabric under is my new table runner fabric (and basement pillow fabric) from IKEA... $2.99 a yard-- Wa-Hoo!

A pretty little vase wrapped in rope-- i'm thinking about making a whole bunch of these for my dining room centerpiece.  It seems almost too easy not to do, huh? 

A large pedestal bowl.  This bad boy is sitting on my coffee table and is going to be the landing place for our remotes.  It is pretty large... like 3 or 4 of my heads. 

Anyone else have any great finds from this weekend?!?

Hope its a GREAT week!

Carolyn

Monday, April 11, 2011

geeking out

Oh-me-goodness! So I logged into this lil' ol blog last night and noticed that I had more visitors over the weekend then E-V-E-R before in a two day period-- WAY more. So I asked myself: self, what gives?  I hadn't posted in a week so why are people stopping by all randomly?  Well, my friends, it's cause my new BFF (kidding- I swear I'm not psycho Joi :-)) posted on her UBER popular blog, Nuestra Vida Dulce about my little art project I posted last week.  It's kind of a big deal... Joi is legit in the blogger world... she's even been on the Nate Berkus Show.  That's right... I know someone (OK so Ive never really met her- but that's really just a technicality) that knows someone famous... pretty amazing, ey? All the dramatics aside, I geeked out, it's the small things in life, you know? :-)

My camera is acting a little weird so I cant load my pics from this weekend BUT check back tomorrow... you may just see some weird lookin' ceramic bird heads... did I entice you?  No? Well, stop by anyways:-)

Carolyn

Saturday, April 2, 2011

Pictureka!

Happy weekend!  I am not sure about you all but I am majorly feeling like brightening up this house for the spring and summer!  I pulled out my seashells and plethora of white crap and now the house looks like it vomited "summer" :-)  


Anywho-- you know how we ordered our new leather sectional for the basement?  Well, its still not here... we have three more weeks to go which seems like F-O-R-E-V-E-R... I don't wait well, which means this is painful.  I decided to work on some "art" for our basement, which is void of really anything at the moment besides a random coffee table, or two, so its ready to go once the couch makes its way into our basement.  So I have already worked on the yarn wreaths I showed you the other day and my latest project are these little works of art...


Go ahead and take a moment to oohh and ahhh:-)

So, not that you really need to watch me put these bad boys together but lets be real, this is a blog and I have nothing better to talk about, so humor me please.. 

I picked up some 13 x 13 album frames from Michael's-- I had been looking for these forever but all of the ones I found were $8 or $9 bucks.. not much but when you need 8 of them it gets a little pricey for a cheap project.  SO... I checked the Michael's weekend ads every week and finally found these on sale for $4.99 THEN I cut out a little bonus 25% off coupon for the entire purchase and bought all 8 of them for just over $30.00!  


When I found this packet of 8 large stickers at Homegoods for $12.99- it was a moment. A BIG moment. I could have cried-- they were exactly what I had been looking for and they were BEYOND cheap.    


They were meant to be stuck directly to a wall but I thought they would look SO much better all framed up and fancy looking.  See sticky...


I opened the back of the frame and got myself all ready to cut the sticker and place it in.. I figured there was no need to unpeel it since it would be framed. 


This is about the moment that I realized I majorly failed.  My frame was about 1/2 inch too big.. so off to plan B... luckily the frame had a perfectly sized white piece of paper in it that I was able to peel and stick my "sticker" onto-- it made for a slightly larger white outline that was slightly noticeable but only if you really stare at it. I couldn't take a picture of the peel and stick process cause it was STRESSFUL... I kept getting pockets of air and then the sticker wouldn't come off... not a good time at all. 


 At the end of the day I am in love!  My couch needs to get here soon so I can hang these bad boys up!


Hope you all are having a GREAT weekend!


Carolyn

Sunday, March 27, 2011

tulle time

Does anyone know what time it is?  Tulle Time!!! Don't get too excited this post is not about JTT (for those non Tool Time fans that would be Jonathan Taylor Thomas) but about the amazingness that is a roll of tulle.  One of my most favorite people in the world had a sprinkle today (Hi Ash!!) and I decided to try my hand at making her little female bun in the oven a homemade tutu! This is the kind of project that makes even the most non-crafty people feel like superstars.

So how did I make it?  Well, I picked three colors of tulle; white, light pink, and dark pink and role of elastic and with my sewing machine I was off.

Here is the elastic that I bought.  Unfortunately I don't have a picture of this step but all I did was cut a piece of elastic-- I guesstimated on how big around a baby would be and I sewed the two end together so I had a round piece of elastic.  I was thinking you could probably find a stretchy headband (you know the workout ones??) and use that if you don't want to sew the piece together.

Then I grabbed my tulle.. here are two of the colors I chose... blush and bashful (i.e. pink and pink... Name that Movie!!)

I cut strips of the tulle... again I totally guesstimated on the length... The tulle is wrapped around the band so it ends up being half of the length.  Keep in mind that the longer it is the longer the skirt will be. You basically take the piece of tulle and wrap it around the elastic band so that it is equal length on both sides... then you tie the tulle in the knot twice...that's it!  I did alternating colors so a piece of light pink then dark pink the whole way around 


Close up and personal shots of the lovely knots.


Here is the finished product!  Looks like a fairy skirt:-)  Dan looked at it and said "How big is this baby supposed to be" and I realized that I went a little large so I made another one that has a smaller waistband and shorter pieces of tulle.

                                    
                                                                Here is the little one!

Anyone else have some fun with tulle this weekend?!?

Carolyn


Thursday, March 24, 2011

wrap it up!

Well its official! I have a new found obsession with yarn wreaths :-)  For all you avid readers you will recall that I picked up some cheap-o wreaths at my local thrift store a few weeks ago.  Well, I decided to fashion them into some pretty wreaths for my soon-to-be updated basement.  I made a yarn wreaths back in January but didn't really go over how to make them since I was battling a case of the "blah's" so today is your lucky day! 

Here is how I got started.

Grab some wreaths (covered in plastic), some yarn, and some felt

Wrap and wrap and wrap away... I went over mine twice to
make sure the wreath didn't peek through

Ta-da!  All wrapped up!

Take a piece of felt and cut it into a big circle...
symmetry doesn't count obviously, as mine is all jacked up:-)

Then cut around the edge so you have some squiggle to it like this.  
This is a project that doesn't require perfection- thank goodness!

Then starting at any point begin cutting the circle around and around

Keep going...

Almost there...

Ahh.. all done!  The end will have a little nub like mine does

Starting at the beginning (i.e not the nub piece) start rolling your felt around and around

Keep going... man alive do I need a mani!  Step judging people and lets move on... :-)


Once you are done, flip the flower over and this is what the bottom will look like


Grab some glue... this is what I used

Put a little glue on the nub

And did you guess whats next?  Fold it over and press

This is what your flower will look like...perdy right!


Then take your wrapped up wreath and glue your flower on

Here is my wreath!!  Not sure where this is going in the basement but I am LOVING it!
I have one more wreath to work on and am thinking that I will use the same color yarn but I'm not sure if I should do the same color flowers or if I should change it up slightly by using dark grey, white and maybe a pop of blue.  What do you all think?

Hope its been a great past few weeks for you all! 

Carolyn